Jun 05

We are picking  tomatoes

We have been picking  tomatoes for about a week, we picked our first tomatoes on the 28th of May we picked about 166 lbs of tomatoes the last week of may. We have already picked over 102 lbs In the last 4 days. We have beefsteak, paste tomatoes, sandwich slicers, and more. If anyone is interested let me know.

[Best_Wordpress_Gallery id=”12″ gal_title=”6-5-18″]

May 15

It’s May and Lots of Tomatoes

I’m a little behind on posting but here is the latest on the garden. It’s the middle of may and we have lots of tomatoes just waiting for them to start turning red.

[Best_Wordpress_Gallery id=”11″ gal_title=”5-15-2018″]

Apr 28

Garden is 8 Weeks Old Now

Here you can see all the strawberries on the plants, the strawberry garden is only 4 weeks old. Also hundreds of tomatoes all still green -so hard to see, and lots of flowers. The tomato trees are really healthy and quite large.  You can see my 6 foot walkway between the rows is almost gone.

The pH on the strawberries got up to 8 but I got it corrected. That is what caused the yellow leaves with green veins. It locked up the iron so it wasn’t available to the plant. The new growth should be coming in greener in the next 2 weeks.


Apr 18

Here is a walk-thru of the garden

I did a little walk-thru of the garden currently. Everything is doing so well. All the plants are loaded with flowers. We also have quit a few green tomatoes already. Even the strawberries have lots of flowers and the start of strawberries.

Apr 02

Easter gave us Fabulous Weather

Hope everyone had a fun Easter. The weather here was fabulous. We have our first tomatoes and strawberries popping out of the season.

[Best_Wordpress_Gallery id=”9″ gal_title=”april 1 2018″]

Mar 31

Getting this years Garden Going 2018

We have been getting our garden going this year. We started planting on March 2nd. The gallery below is the garden so far. The images were taken on March 2nd then March 13th with the most resent images taken on March 30th. So far we have 45 trees of tomatoes, 360 plants planted and 10 trees of strawberries, 480 plants planted. Everything is growing beautifully.

[Best_Wordpress_Gallery id=”8″ gal_title=”2018 garden”]

May 20

Our Garden is doing fabulous

Its now mid May and our vegetable garden is doing fabulous.   We are picking veggies and enjoying everything in the garden.

[Best_Wordpress_Gallery id=”7″ gal_title=”WP_20170517″]

Nov 30

Our Open Air Suspension Greenhouse

Here are some images of our Open Air Suspension Greenhouse being assembled in September 2011 for growing Basil in an EzGro Vertical Garden. We have been doing a lot of work on it. The sides are up now and it is fenced in. Next we need to do the front and back and start getting the EzGro Veggie Tree stacks put in. We are planing on doing about 100 of the EzGro Veggie Tree stacks

[Best_Wordpress_Gallery id=”2″ gal_title=”open-air-greenhouse-2011″]

Feb 20

How to Assemble a Suspension Type Open Air Greenhouse

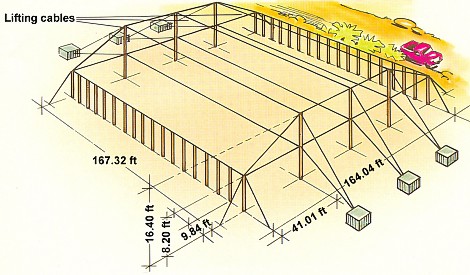
  • Use poles of 10.49 ft, planted to a minimum depth of 23.62 inches.
  • Plant two rows of poles 164.04 ft apart.
  • Each row consists of 18 poles at center-to-center intervals of 9.84 ft.
  • Prepare 19.68 x 19.68 ft poles by fitting 0.47 inches drawbolts through drilled holes at what will be 16.40 ft and 8.20 ft respectively above ground level.
  • Plant these poles – three on each side of the square area – to a minimum depth of 3.28 ft and at center-to-center intervals of 41.01 ft.
  • Brace and anchor these 19.68 ft poles very securely with two stays each, tied around the pole just above each of the drawbolts.
  • Now strain 0.19 inches wire rope between the drawbolts at the 8.20 ft level and, preferably, more substantial 0.23 inches wire rope between the drawbolts at the top 16.40 ft level.

Basics-image15

  • Brace and anchor the two rows of shorter poles by straining a wire along the length of each row, across the tops of the poles. Alternatively, you can nail split poles across the tops.


Fitting the shadecloth:

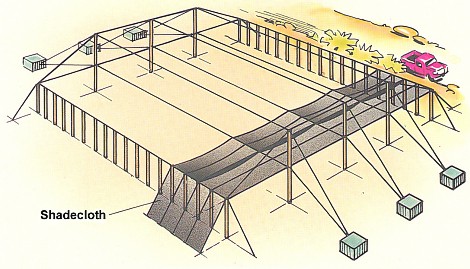
  • Lace up the shadecloth with edge wire as described previously and lift each roll into position on the cross wire above the short poles.
  • Secure the edge wires and sew the cloth at one end and then roll the cloth out over the lower cross wires between the tall poles.
  • Fasten and tension the edge wires, stretch the shadecloth and sew the opposite end as described for other structures.
  • Tie binding wire to the upper cross cables, allowing it to hang down on either side of the lower cross cables through the gaps between the shadecloth sheets.
  • Clip or tie the edge wires together at approximately 19.68 inches intervals.

Lifting and stabilizing the roof:

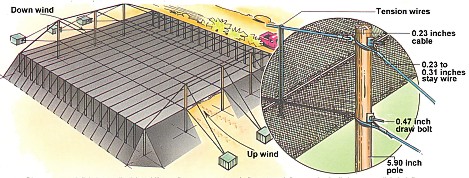
  • To achieve the desired”domed” effect, start at the midpoint of the structure by lifting the center of the roof with the vertical tensioning wires and tying the roof in position, as shown in the illustration.
  • Then lift the centers of the roof on either side with the other two pairs of cross cables.
  • Now revert to the middle cross cables and tighten the tensioning wires to the left and to the right of the center wire.
  • Next, tighten the corresponding tensioning wires on the two outer cable pairs, and repeat the entire procedure until you reach the sides of the shadehouse and all the tensioning wires are taut.

  • The upwards deflection of the roof stabilizes it against upward wind forces whilst the tension in the top lifting cable stabilizes it against downward wind forces.
  • As a general rule when erecting suspension-type structures larger or smaller than the one illustrated, you can work to the distance between the top and bottom lifting cables being 5% of the width of the span – in the illustration, the span is 167.32 ft, and the distance between the upper and lower cables 8.20 ft (=5% approx.).
  • Ideally, all four sides should be enclosed as described earlier.


Aug 23

High Density Vertical Growth (HDVG) Garden

Hot-PeppersIn Victorian times, houses were very narrow, multi-storied, and had a small “footprint” on the land. This left more land for private gardening, and commons, among other things. Then came the 1960s, and “ranch style” homes, with half-acre grass covered lots. By the 1970′s anyone with a vegetable garden in a suburban or city back yard were “hippies,” “weird,” or “old fashioned.”

The 1990′s saw the boom of Mega-Mansions on postage stamp sized lots, weekly lawn-care crew visits, and still little vegetable gardening on a respectable scale, regardless of whether one lives in the city or the suburbs. Now we have an oil crisis overlain with a salmonella crisis: both of which the US Federal government seems incapable of dealing with. Vertical gardening might help change that.

…the system is designed to grow vegetables and other foods much more efficiently and with greater food value than in agricultural field conditions. The HDVG system demonstrates the following characteristics:

  • Produces approximately 20 times the normal production volume for field crops
  • Requires 5% of the normal water requirements for field crops
  • Can be built on non arable lands and close to major city markets
  • Can work in a variety of environments: urban, suburban, countryside, desert etc.
  • Does not use herbicides or pesticides
  • Will have very significant operating and capital cost savings over field agriculture
  • Will drastically reduce transportation costs to market resulting in further savings, higher quality and fresher foods on delivery, and less transportation pollution
  • Will be easily scalable from small to very large food production situations